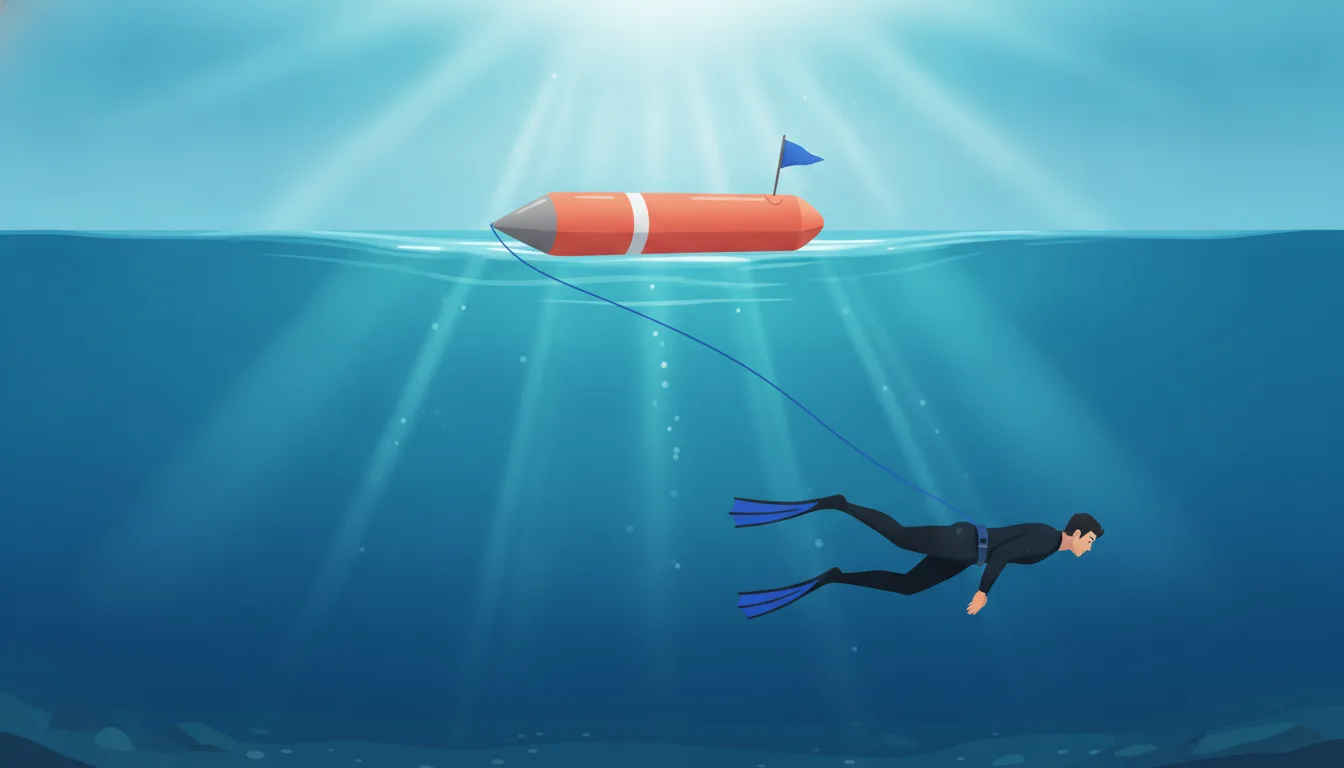
A tow buoy is the cheapest way to stop being invisible to boats — but the moment you clip one on, you're towing several metres of rope around your fins. Here's how to rig one for the kind of snorkeling where nothing goes deeper than about five metres.
Breath-hold diving carries a real drowning risk, and a buoy does nothing to reduce it — hypoxic blackout can strike without warning in three metres of water. This is a rigging guide, not a substitute for a certified freediving course, and the one rule it can't replace is: never dive alone.
Think of a tow buoy as a floating anchor point that stays on the surface while you don't. It carries the flag that tells boats you're there, it holds your keys and your water bottle, and it gives you something to hang off between dives. It travels with you because it's tied to your waist — and that piece of rope is the entire subject of this post, because it's also the only new way this gear can hurt you.
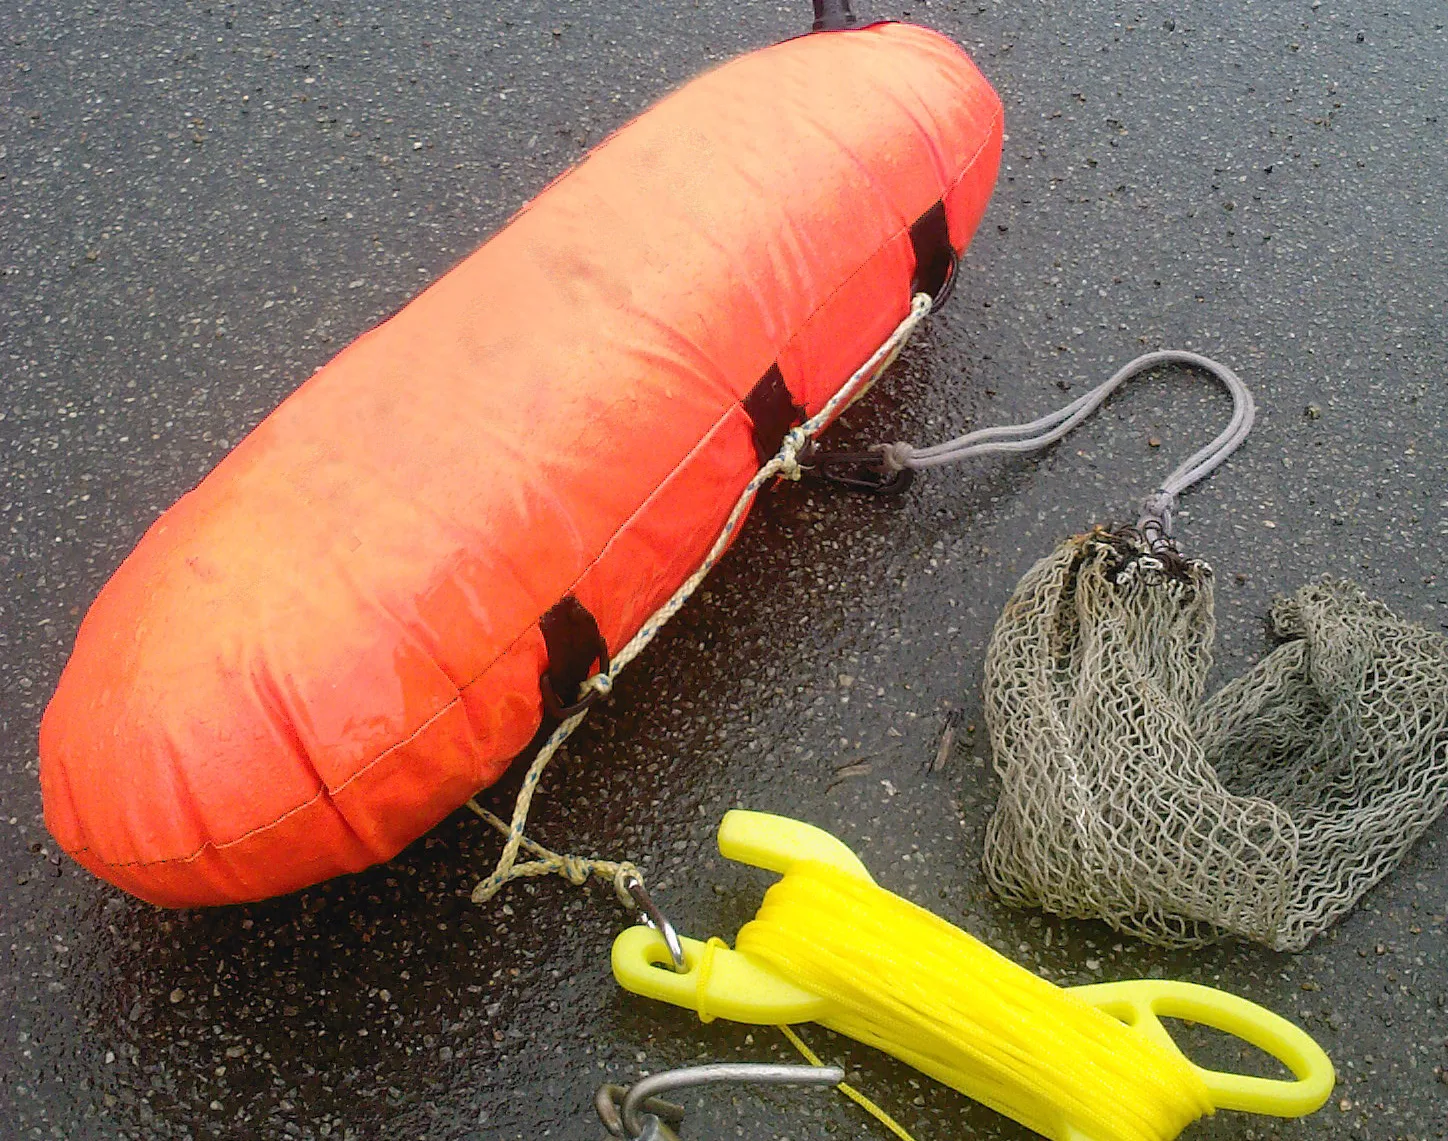
The gear itself. Two details to note now, because the rest of the post keeps referring to them: the black webbing loops stitched along the flank — that's where the surplus line gets stowed — and the yellow spool on the right, a line winder. Photo by Calcineur, cropped, CC BY-SA 3.0.
Everything below is sized for relaxed snorkeling with repeated duck dives, typically 3–5 metres and no deeper. That constraint does real work: it's why the line is short, why the rig is simple, and why none of the deep-freediving apparatus — lanyards, bottom plates, counterweights — shows up here.
What a buoy gives you, and what it doesn't
A buoy solves visibility, logistics, and rest — it does not solve safety. It's worth being blunt about which column each benefit falls into, because people routinely buy a buoy and quietly feel safer diving alone afterwards.
| What you might want from it | Does the buoy deliver? | Why |
|---|---|---|
| Being seen by boats and jet skis | It's the only thing on the water at your position that's above the waterline | |
| Somewhere to rest between dives | Positive enough to hang off with both arms without kicking | |
| Carrying keys, water, a camera | Most torpedo buoys have a dry compartment | |
| Keeping track of where you are | A fixed reference on a featureless surface, though it drifts with you | |
| Something to grab if you cramp | Only if the line is short enough that you can reach it | |
| Someone to notice you black out | A buoy cannot see you, reach you, or lift your airway clear |
That last row is the one that matters. Repeated breath-hold dives carry a risk of hypoxic blackout even in shallow water[1], and the recognised standard in freediving is one up, one down — a buddy on the surface with eyes on you, close enough to intervene, for every single descent[2]. A buoy is equipment. It is not a person.
Why you need one at all
Beyond common sense, in Spanish waters a surface marker is a legal expectation rather than a nice-to-have. Under Royal Decree 550/2020, free/breath-hold diving is broadly exempt from the diving-safety regime, except for one thing: dive outside a buoyed bathing zone and you must mark your position with a surface marking device (Article 5b). Vessels must then keep a minimum safety distance of 50 metres from it (Article 14.2).
That term is doing more work than it looks. The decree defines a surface marking device as "a buoy of a highly visible colour […] carrying the 'Alfa' flag of the International Code of Signals" (Article 2r) — the blue-and-white swallowtail meaning I have a diver down, keep well clear at slow speed. The flag isn't an accessory to the buoy; it's part of what makes the buoy the thing the law is asking for.
The red flag with a white diagonal stripe is a common sight on dive buoys, and it is not the Alfa flag — it's the American "diver down" flag, invented by a US Navy diver in the 1950s, and it carries no legal standing in Spain. The two are impossible to confuse once you've seen them side by side: Alfa is blue and white with a swallowtail cut, the diver-down flag is a plain red rectangle. A buoy flying the red one is not the dispositivo de balizamiento that Article 2r describes. Alfa flags are sold separately.
Practically: a snorkeler's head at surface level is close to invisible from a planing hull at 200 metres. A brightly coloured torpedo buoy with a stiff flag is not.
The system: buoy, line, belt
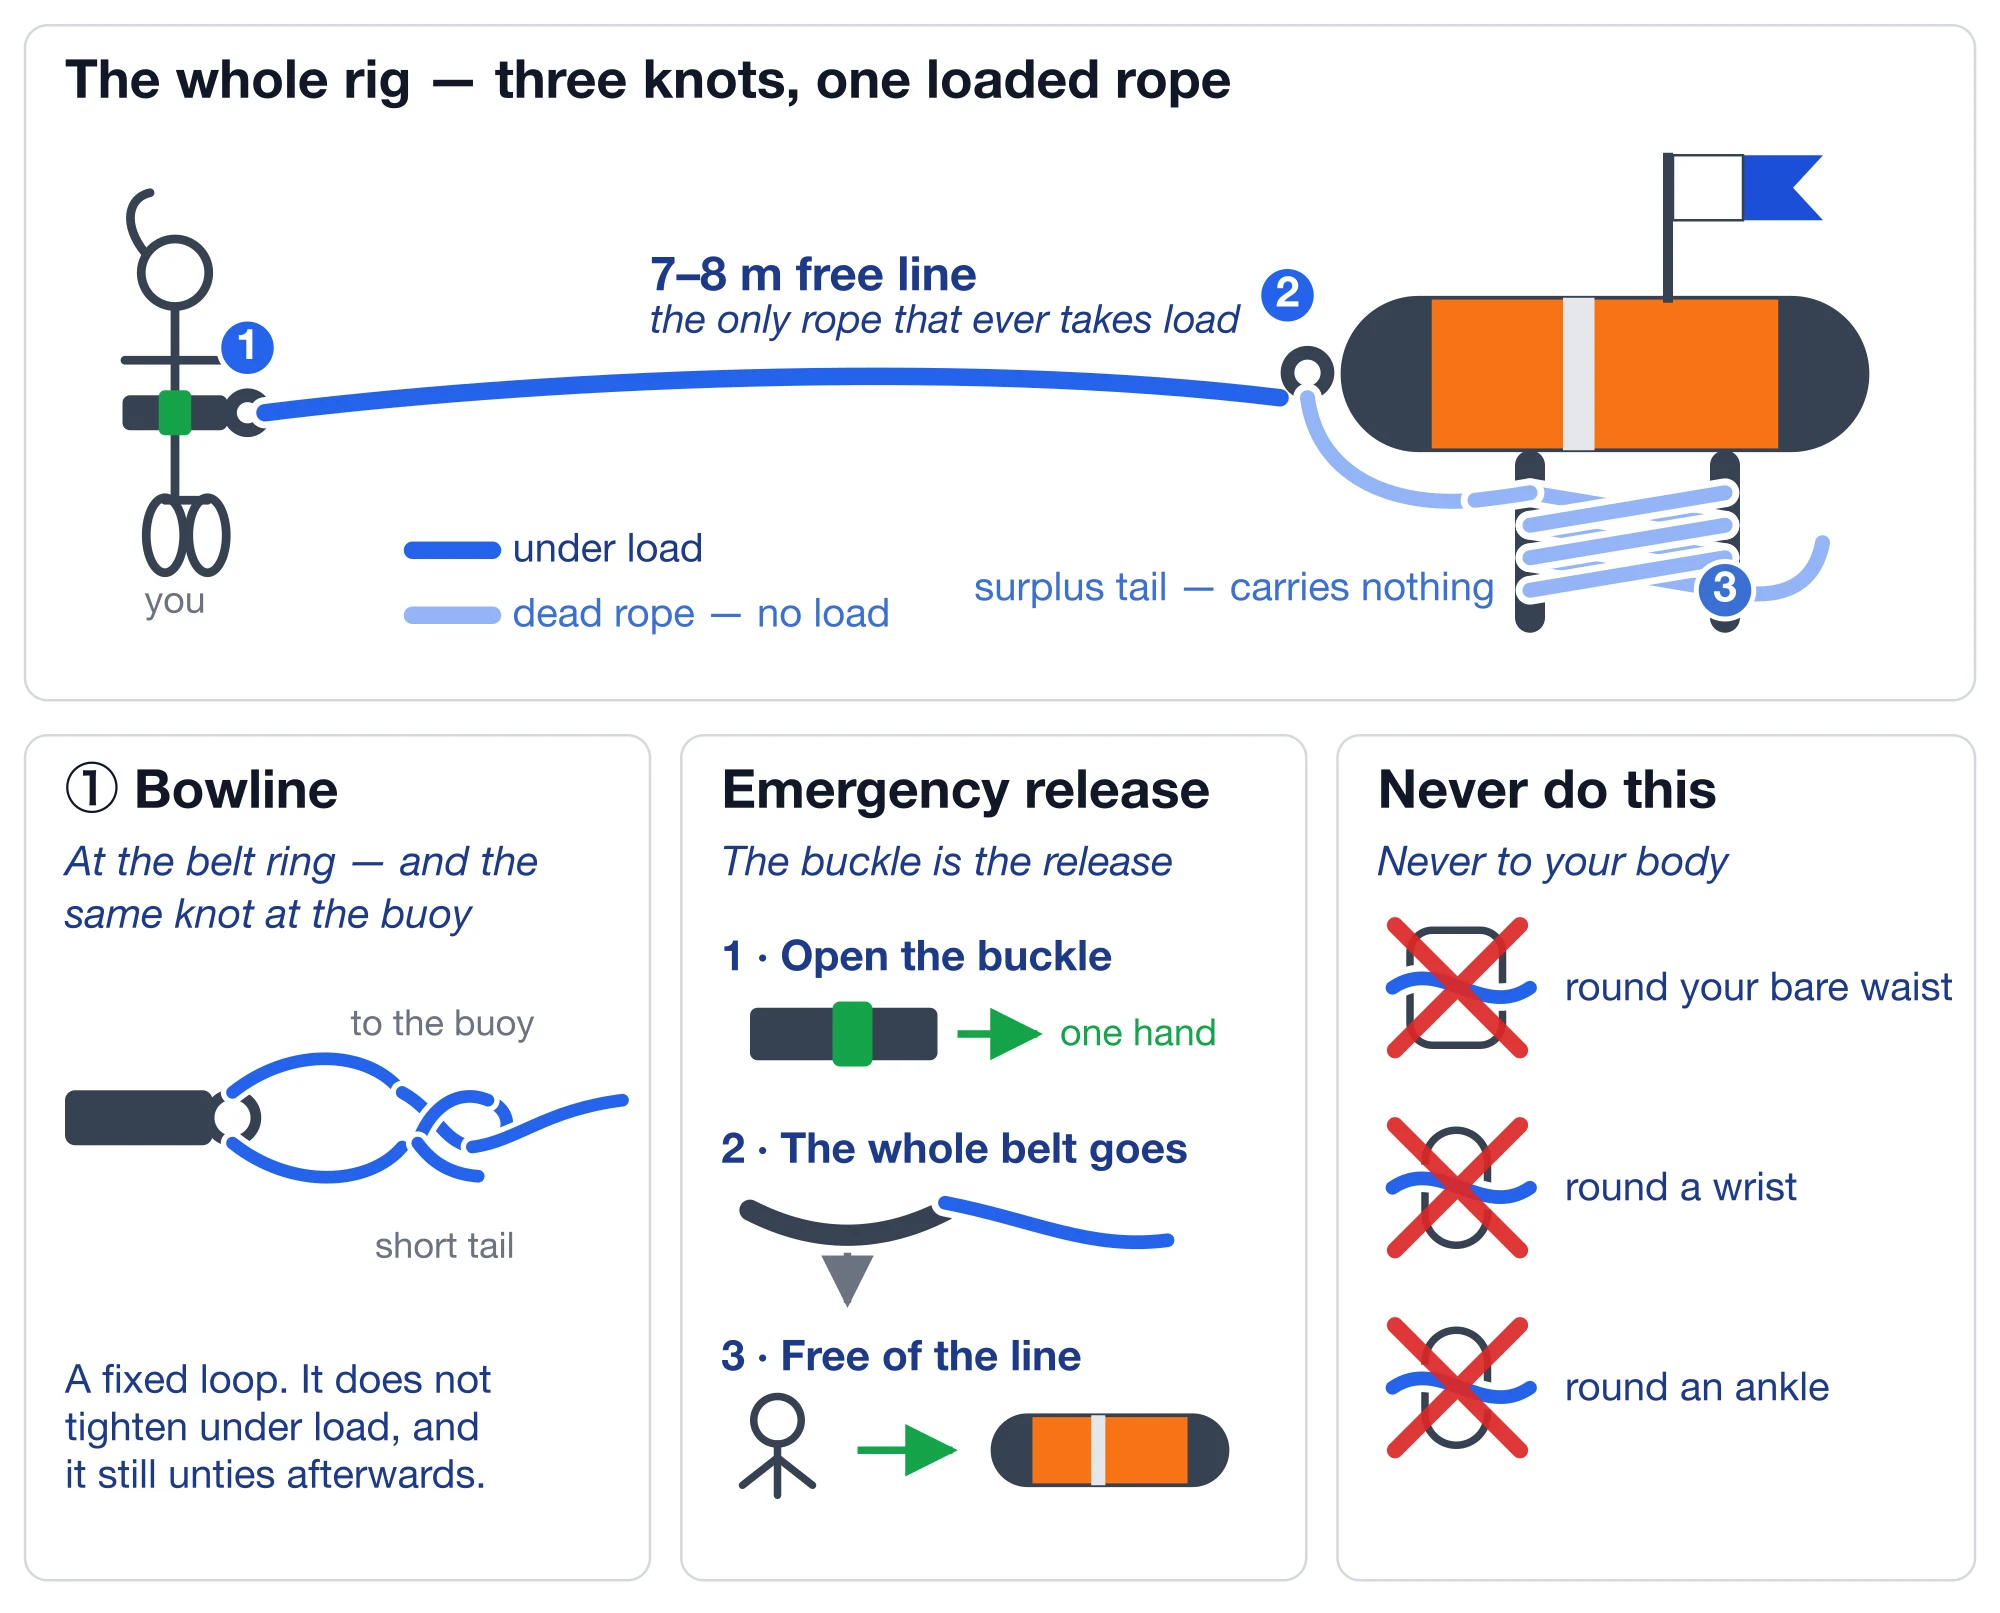
The whole rig is three parts and one rule, and it's worth following the rope from one end to the other before tying anything.
The same thing written out, so you can count it:
| Where | What's there | Knot |
|---|---|---|
| Your waist | Quick-release belt | the buckle — not a knot |
| Belt ring | The rope starts | Bowline |
| ↓ 7–8 m | The free line — the only rope that ever takes load | — |
| Buoy's nose ring | The rope attaches to the buoy | Bowline, again |
| ↓ ~12 m | Surplus tail, hanging off that knot, carrying nothing | — |
| Buoy's side loops | The tail wound back and forth | a figure-eight — a stow pattern, not a knot |
| The last wrap | Stops the bundle unwinding | Slipped half hitch |
| The rope's tip | Hangs loose, heat-sealed | Nothing at all |
Every knot in that table links to a short video of someone tying it.
Three knots in the whole rig, and two of them are the same bowline — the rope's actual end is tied to nothing. Everything else on that list is either a buckle or a way of bundling slack.
The rule: the belt is the emergency release, and nothing else is. Not the knot, not a clip, not your ability to untangle rope while out of breath. If the system goes wrong, you open the buckle, the whole belt goes, and you swim away from it.
Rigging it, in order:
- Tie the buoy end to the tow ring at the buoy's nose, with a bowline. Same knot as the belt end — there is only one knot to learn here. That nose ring is the load-bearing point; the small loops along the flanks are for stowage, not for towing you. The one thing to get right: tie it at the point on the rope that leaves 7–8 m running to the belt, not at the very end of the rope. Whatever is left over becomes the tail of that bowline and hangs off the buoy doing nothing. (A bowline also happens to be the easiest knot to tie here, because you only have to feed those 12 m of tail through the ring once.)
- Use a waist belt with a quick-release buckle. A rubber weight belt with a marseillaise buckle or a webbing belt with a side-squeeze buckle both work; what matters is that one hand opens it.
- Attach the line to a dedicated loop or ring, positioned at the hip or rear hip so the buoy trails behind you rather than pulling across your body.
- Tie it with a bowline if the belt has a suitable ring. The bowline gives you a fixed loop that doesn't tighten under load, is easy to eyeball for damage, and still unties after being pulled on all afternoon. If the belt or buoy manufacturer specifies a different connection, follow them instead.
- Practise the release. One hand, eyes shut, in the water. You should know exactly where that buckle sits before the day you need it.
Step 1 is the one people get backwards, and it decides the whole geometry of the rig. Tying at length means the load runs belt → free line → buoy knot and stops there — the leftover rope is never part of what holds you to the buoy. Tie at the end of the rope instead and the surplus lands between the knot and you, so every tug travels through whatever you used to bundle it up.
Note also what step 4 is not doing. The knot is there to be reliable, not to be undone in a hurry — a loaded bowline underwater is not a quick release. That job belongs entirely to the buckle in step 2.
How much line for a five-metre dive
The instinct is to carry plenty of rope. Resist it: every metre of line you're not using is a metre of loose rope drifting around your fins.
| Typical dive depth | Free line |
|---|---|
| 2–3 m | ~5–6 m |
| 3–5 m | ~7–8 m |
| More movement, or small waves | ~8–10 m |
For ordinary 3–5 m duck dives, 7–8 metres of usable line is the place to start. You want enough slack that the buoy never tugs at your hips mid-descent, and not one metre more.
The failure mode at both ends is easy to picture. Too little line and the buoy anchors you short of the bottom, or worse, drags you back up mid-dive. Too much and you're diving through a nest of your own rope.
Storing the excess on the buoy
If your buoy came with 20 metres of line and you only want 8, the other 12 have to live somewhere — and that somewhere is the buoy, not the water.
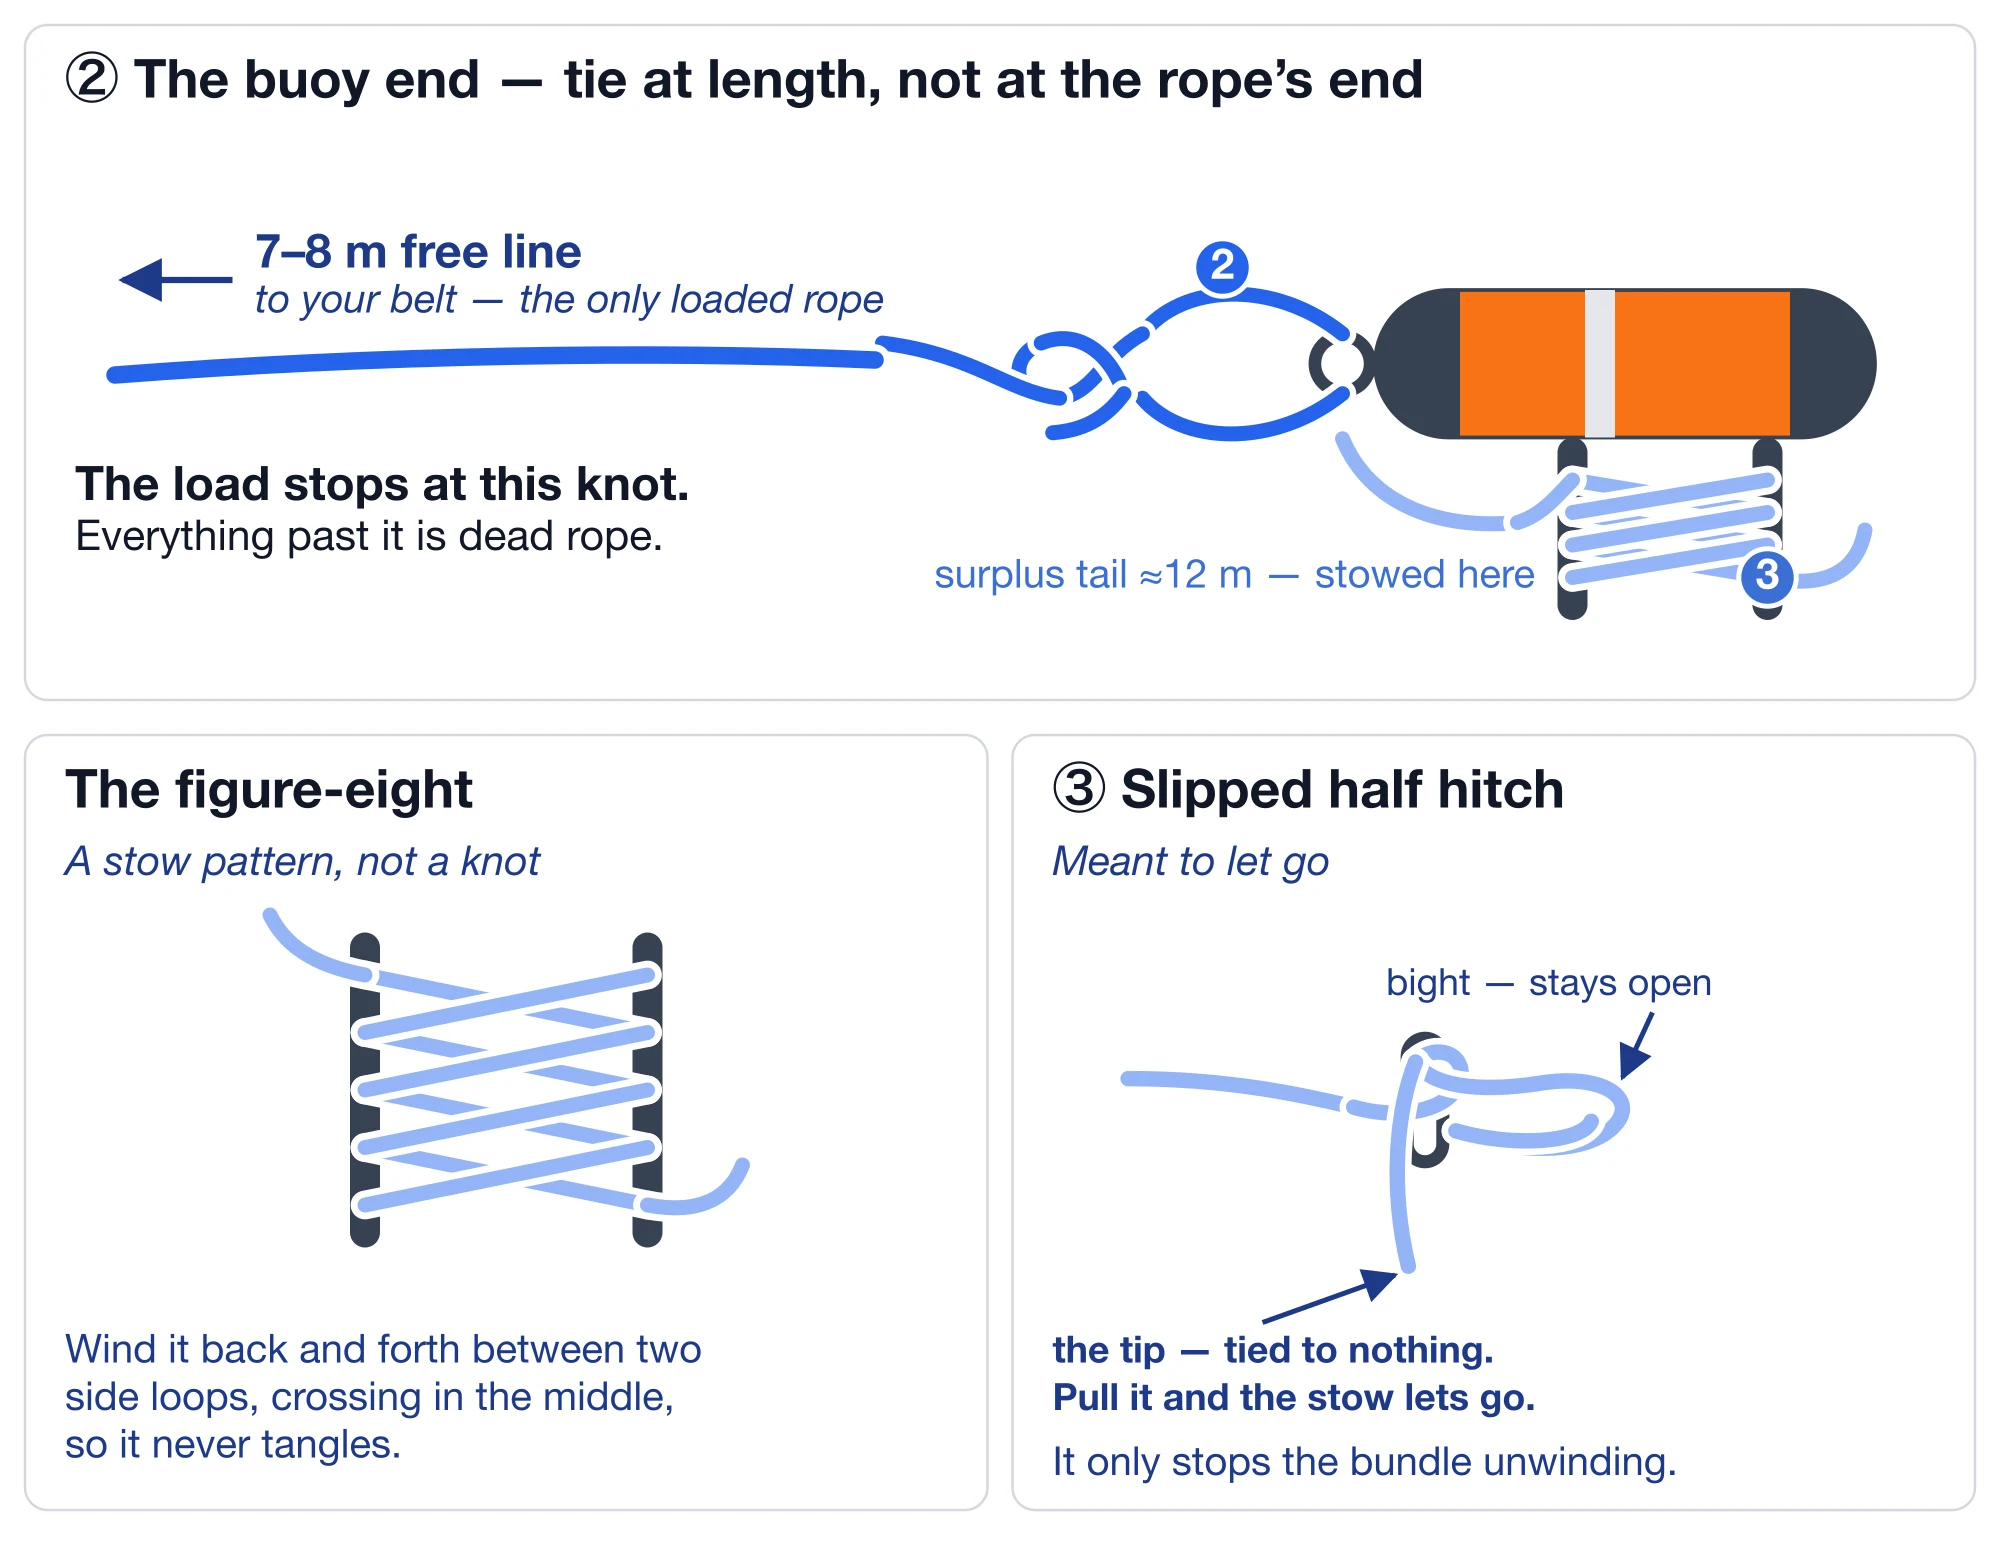
Two different things happen here, and mixing them up is what makes this step confusing.
The figure-eight is not a knot. It's a stow pattern — the same one used to bundle an extension cord. Take the surplus tail and wind it back and forth between two of the buoy's side attachment loops, crossing in the middle so each pass sits over the last in an X. The crossings are the whole point: they stop the bundle rolling, twisting, or collapsing into a tangle, so the rope pays out clean instead of coming off as a knot. If there's a lot of tail, spread the same pattern across three loops rather than piling more turns onto two.
The slipped half hitch is the knot, and it does one small job: it closes the last wrap so the figure-eight can't unwind itself. It's an ordinary half hitch tied with a bight instead of the end, which is what makes it a quick release — pull the free end and the whole stow lets go, so you can add length mid-session without picking at anything.
Which answers the question people get stuck on: what happens to the actual end of the rope? Nothing. It goes round a side loop to form that slipped half hitch, and whatever is left past the knot just hangs there — heat-seal the tip so it doesn't fray and that's the end of it. The rope's end is never tied to anything that holds you, because the tail is dead rope: it carries no load at all, so if the hitch worked loose the only thing that happens is a bundle coming undone.
What to avoid: tight, heavily loaded knots for storage. The moment you actually want that extra rope, you'll want it quickly, and a jammed knot on a wet line is a two-minute job with cold fingers. If you're adjusting the length constantly, a small line winder on the buoy is cleaner than tying and untying anything.
Entanglement: the hazard you just added
Everything above exists to manage one risk. A buoy line is a rope tied to a person who periodically goes underwater and can't breathe — the entire discipline is making sure you can always leave it behind.
The rule British Sub-Aqua Club applies to marker buoys generalises well: the buoy should never be clipped to the diver, and you must be able to release it quickly if it snags, jams, or gets pulled[3]. In our setup, the belt is that release.
So, never:
- Rope around the wrist
- Rope around an ankle
- Rope tied directly around your waist, bypassing the belt
- Large coils of slack floating near your fins
- Any knot or clip that would have to be undone before you can get free
And in the water, the decision tree is deliberately short:
A buoy costs €40. Deciding underwater that you'd rather not lose it is the wrong trade, every time.
Checks before you get in
Run the whole system once, every session, before your feet leave the sand:
- Buoy properly inflated
- Buoy attachment point secure and undamaged
- Free line running from the buoy knot itself, not out of the stowed wraps
- Surplus tail still stowed and still slack
- Line free of cuts, abrasion, or sun-rotted patches
- Belt attachment secure
- Buckle opens cleanly, one-handed
- No large loose loops of rope anywhere
- Enough free line for the depth you're planning
Habits in the water
Keep the buoy behind you. It follows; you don't tow it like a sled.
Then, before every duck dive — this becomes automatic within a session — glance down and confirm the rope isn't between your legs, around an ankle, crossing your fins, or wrapped around your mask strap or weight belt. Then duck dive normally.
One thing not to do: don't descend holding the buoy line. Pulling yourself down a line is a deep-freediving technique that belongs with a proper vertical rig and a lanyard. On a tow buoy, hauling on the line just drags the buoy across the surface and puts your hands exactly where you don't want them. The buoy stays up, you go down, the line goes slack.
The configuration, in one place
| Element | Setup |
|---|---|
| Typical depth | 3–5 m |
| Buoy | Torpedo-style, with Alfa flag |
| Free line | ~7–8 m |
| Buoy attachment | Bowline to the tow ring at the nose, tied 7–8 m from the belt end |
| Excess line | Dead tail off that knot — stowed on the buoy in a figure-eight, closed with a slipped half hitch |
| Body attachment | Quick-release waist belt |
| Line attachment | Bowline to a dedicated belt loop or ring |
| Knots, in total | Three — a bowline at each end, plus the slipped half hitch closing the stow |
| Emergency release | Open the buckle, drop the entire belt |
That's the whole rig. For shallow recreational duck diving, simplicity beats capability — every extra clip, spool, or lanyard on this system is one more thing that can catch on rope you're already trying not to get caught in.
Get the buoy, fly the flag, keep the line short, and bring a buddy who's actually watching. The buoy handles the boats. The buddy handles you.
References
- Shallow Water Blackout — StatPearls, NCBI Bookshelf (National Institutes of Health) — on hypoxic loss of consciousness during breath-hold diving, including at shallow depths.
- Freediving Risk Assessments — Alert Diver, Divers Alert Network — on the one-up-one-down rule and rescue-trained buddy supervision.
- Safe use of Surface and Delayed Surface Marker Buoys — British Sub-Aqua Club — on never clipping a marker buoy to the diver and always being able to release it quickly.