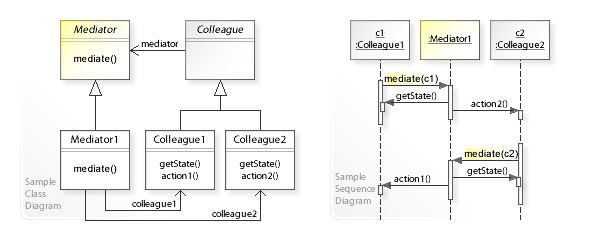
Mediator
Especially useful when you're dealing with complex interactions between objects.
In essence, the Mediator Pattern is all about reducing the complexity of communications between multiple objects or classes. It acts like a central hub or a "mediator" through which all communication passes. This means, instead of each object calling methods of other objects directly, they go through the mediator.
Why Use It?
- Decoupling: It's great for when you've got a bunch of classes that are tightly coupled, meaning they rely heavily on each other. The mediator decouples them by being the only object that knows how they interact.
- Simplifies Maintenance: Changing how objects interact becomes easier since you only need to modify the mediator, not each individual object.
- Reduces Subclassing: Instead of creating numerous subclasses to customize behavior, you can change the mediator.
How It Works?
Mediator pattern in the Wikipedia
- Mediator Interface: Defines the interface for communication.
- Concrete Mediator: Implements the mediator interface and coordinates communication between colleague objects.
- Colleagues: Objects that interact with each other through the mediator.
Example in Web Development:
Imagine a dashboard with multiple widgets (like a chatbox, notifications, user info). Instead of these widgets talking directly to each other (which can be a maintenance nightmare), they communicate through a mediator. This keeps the widget code simpler and more modular.
In the Context of React & Redux:
Think of Redux as a sort of mediator. Your React components (colleagues) don't communicate directly with each other. They dispatch actions to Redux (mediator), which then updates the state and informs the components of any changes.
Pros and Cons
Pros:
- Reduces direct dependencies between components.
- Simplifies object protocols.
- Centralizes control.
Cons:
- Can become a "God Object" (overly complex and handling too many things).
- Might be overkill for simple scenarios.
Implementation
Let's dive into an implementation example of the Mediator Pattern, tailored for web development.
Scenario
Imagine a system where we have several components: ComponentA, ComponentB, and ComponentC. These components need to communicate with each other. Instead of them calling each other's methods directly, they will communicate via a mediator.
Step 1: Define the Mediator
First, we'll create a mediator class that will handle the communication between the components.
class Mediator {
    constructor() {
        this.components = {};
    }

    register(component) {
        this.components[component.name] = component;
        component.setMediator(this);
    }

    send(message, fromComponent, toComponentName) {
        const toComponent = this.components[toComponentName];
        if (toComponent) {
            toComponent.receive(message, fromComponent);
        }
    }
}
Step 2: Define the Components
Each component will have a reference to the mediator and will use it to send messages.
class Component {
    constructor(name) {
        this.name = name;
        this.mediator = null;
    }

    setMediator(mediator) {
        this.mediator = mediator;
    }

    send(message, toComponentName) {
        this.mediator.send(message, this.name, toComponentName);
    }

    receive(message, fromComponentName) {
        console.log(`${this.name} received a message from ${fromComponentName}: ${message}`);
    }
}

class ComponentA extends Component {}
class ComponentB extends Component {}
class ComponentC extends Component {}
Step 3: Using the Mediator
Now, let's create instances of the mediator and the components, and see how they interact.
const mediator = new Mediator();

const componentA = new ComponentA("ComponentA");
const componentB = new ComponentB("ComponentB");
const componentC = new ComponentC("ComponentC");

mediator.register(componentA);
mediator.register(componentB);
mediator.register(componentC);

componentA.send("Hello from A", "ComponentB");
componentB.send("Hey there, A! This is B.", "ComponentA");
componentC.send("Hello everyone!", "ComponentA");
Explanation
Mediator: Central communication point for components.ComponentA,ComponentB,ComponentC: Communicate with each other through the mediator.sendmethod: Used by components to send messages.receivemethod: Used by components to receive messages.
Conclusion
In this setup, we've decoupled the components from each other. They no longer need to know about each other's methods or existence. This makes the system more modular and easier to maintain. You can add new components or change existing ones without affecting others, as long as they adhere to the mediator's communication protocol.
Conclusion
The Mediator Pattern is a powerful tool for managing complex interactions in a more maintainable and scalable way. It's especially useful in large-scale applications where maintaining direct object relationships becomes impractical. Just be cautious about not letting the mediator become too complex.
Functional programming (FP) implementation
Let's reimagine the Mediator Pattern in a Functional Programming (FP) style using TypeScript. FP emphasizes using pure functions, avoiding shared state, and immutable data. We'll use TypeScript for type safety and clarity.
FP Approach to the Mediator Pattern
Step 1: Define Types and Interfaces
First, we define types and interfaces for mediators and components.
interface IMediator {
    send: (message: string, fromComponent: string, toComponentName: string) => void;
}

type Component = {
    name: string;
    send: (mediator: IMediator, message: string, toComponentName: string) => void;
    receive: (message: string, fromComponentName: string) => void;
};
Step 2: Implementing the Mediator and Components
We'll create functions to represent our components and mediator. Notice how we avoid shared state and focus on function inputs and outputs.
const createMediator = (): IMediator => {
    let components: { [key: string]: Component } = {};

    const register = (component: Component): void => {
        components[component.name] = component;
    };

    const send = (message: string, fromComponent: string, toComponentName: string): void => {
        const toComponent = components[toComponentName];
        if (toComponent) {
            toComponent.receive(message, fromComponent);
        }
    };

    return { send, register };
};

const createComponent = (name: string): Component => ({
    name,
    send: (mediator, message, toComponentName) => {
        mediator.send(message, name, toComponentName);
    },
    receive: (message, fromComponentName) => {
        console.log(`${name} received a message from ${fromComponentName}: ${message}`);
    },
});

// Example usage
const mediator = createMediator();
const componentA = createComponent('ComponentA');
const componentB = createComponent('ComponentB');

mediator.register(componentA);
mediator.register(componentB);

componentA.send(mediator, 'Hello from A', 'ComponentB');
Explanation
- createMediator: A factory function that creates a new mediator with
sendandregistermethods. - createComponent: A factory function that creates a new component with
sendandreceivemethods. - Usage: Components are created and registered with the mediator. Components use the mediator's
sendmethod to communicate.
FP Characteristics in this Example
- Immutability: No shared state; each function works with its inputs and returns new data if needed.
- Pure Functions: Functions have no side effects and return the same output for the same input.
- Avoiding Shared State: Components do not hold a reference to the mediator; they receive it as an argument when needed.
Conclusion
This FP-style implementation of the Mediator Pattern in TypeScript demonstrates how you can apply FP principles in a typical design pattern. It emphasizes immutability, pure functions, and avoiding shared state, which are key aspects of functional programming. This approach can lead to more predictable and maintainable code, especially in complex systems.