

Testing Shadow DOM elements can be a bit tricky due to their encapsulation. However, you can access the Shadow Root to test the elements inside it. In this article, we'll explore how to test Shadow DOM elements using React, TypeScript, and @testing-library/react.
What is shadow DOM?
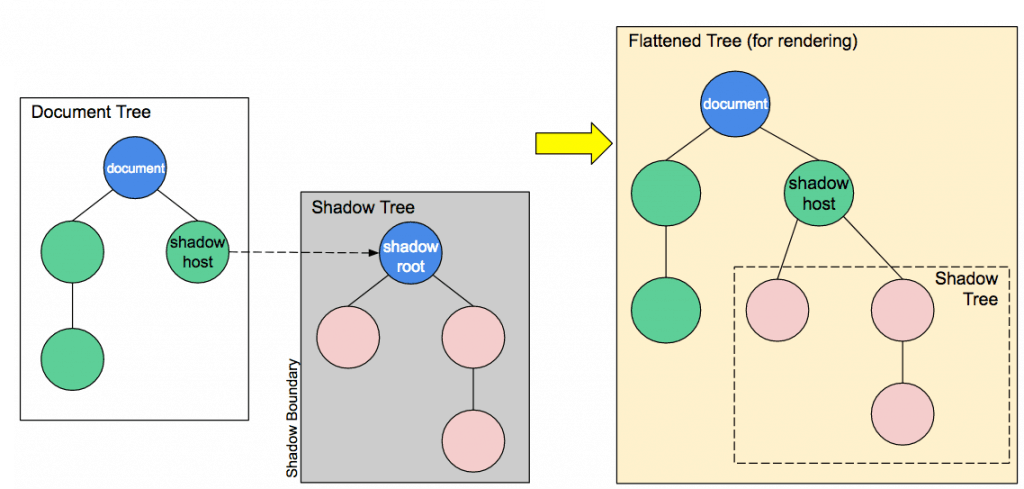
The Shadow DOM is a web standard that encapsulates styles and markup within a web component. This encapsulation allows for a component's internal structure, styles, and behavior to be hidden from the rest of the code, providing isolation and preventing any unintended styling or manipulation from the outside.
Here's a quick rundown of the Shadow DOM:
- Encapsulation: By using the Shadow DOM, you can keep an element's markup structure, style, and behavior hidden and separate from other code on the page. This encapsulation allows for a more modular and maintainable codebase.
- Scoping: Styles defined inside a shadow tree only apply to the elements within the shadow tree. This ensures that styles don't accidentally leak out and affect other parts of the page.
- Composition: You can create complex UI components by composing multiple shadow trees and light DOM. The "light DOM" refers to the normal DOM that interacts with the shadow tree.
- Accessibility: Although the Shadow DOM hides the internal structure, it still ensures accessibility by exposing the necessary semantics to assistive technologies.
Here's an example of using Shadow DOM with vanilla JavaScript:
class MyComponent extends HTMLElement {
  constructor() {
    super();
    const shadowRoot = this.attachShadow({ mode: "open" });
    shadowRoot.innerHTML = `
      <style>
        p { color: red; }
      </style>
      <p>This is inside Shadow DOM!</p>
    `;
  }
}
customElements.define("my-component", MyComponent);
It's worth mentioning that React doesn't use Shadow DOM by default. It's possible to use Shadow DOM with React, but it involves some additional considerations and techniques. Shadow DOM is more common with web components and might be used alongside libraries that work directly with web standards.
The Shadow DOM API two modes
The Shadow DOM API supports two modes: open and closed:
- Open: When a shadow root is attached with mode: 'open', its internals are accessible from JavaScript outside the shadow DOM using the .shadowRoot property. This means you can query inside the shadow root just like you did in your test.
- Closed: If the shadow root is attached with mode: 'closed', its internals are not accessible from the outside. The .shadowRoot property will return null, making it impossible for your test to query inside it directly.
How to test shadow DOM elements?
Testing Shadow DOM elements can be a bit tricky as they reside in a separate DOM, which encapsulates them from the main document. However, you can work around this by accessing the Shadow Root. Here's an example of how you might test a Shadow DOM element using React, TypeScript, and @testing-library/react.
The test works as intended because it assumes the shadow DOM is in open mode, as evidenced by accessing customElement.shadowRoot and performing queries inside it. If the component's shadow DOM were initialized with mode: 'closed', customElement.shadowRoot would be null, and you wouldn't be able to access shadowContent directly in this manner.
Suppose you have a custom element that uses Shadow DOM (e.g. <custom-element />), you could use a component in React to render it:
import React from "react";

const CustomComponent = () => (<custom-element />);

export default CustomComponent;
Then, you can write a test using @testing-library/react to access the Shadow DOM element:
import React from "react";
import { render } from "@testing-library/react";
import CustomComponent from "./CustomComponent";

test("it renders shadow dom content", () => {
  const { container } = render(<CustomComponent />);
  const customElement = container.querySelector("custom-element") as any;
  const shadowRoot = customElement.shadowRoot;
  expect(shadowRoot).not.toBeNull();

  const shadowContent = shadowRoot.querySelector(".shadow-content");
  expect(shadowContent?.textContent).toBe("Hello, Shadow DOM!");
});
In this example, I've used the shadowRoot property of the custom element to access the Shadow DOM, then queried it just like you would the regular DOM. Note that TypeScript might give you type errors depending on the types it recognizes for the custom element. You may need to extend the types or use type assertions to clear those errors, as shown above.
More about the shadow DOM
customElements
The customElements specification is part of the Web Components technology, a suite of technologies that allow for the creation of reusable and encapsulated components in web development. The custom elements specification is responsible for defining and managing custom HTML elements.
Specification
1. Defining Custom Elements
Custom elements can be defined using the customElements.define() method. This method takes two required arguments: the name of the custom element (as a string) and the class that defines its behavior. The custom element's name must contain a hyphen, ensuring it won't clash with any existing or future standard HTML elements.
2. Life Cycle Callbacks
The custom element specification provides life cycle callbacks that can be used to handle various stages of the element's existence. These include:
constructor: Called when the element is created.connectedCallback: Called when the element is added to the DOM.disconnectedCallback: Called when the element is removed from the DOM.attributeChangedCallback: Called when an observed attribute has been added, removed, updated, or replaced.
3. Extending Existing Elements
You can also create a custom element that extends an existing HTML element. This can be done by passing an options object as the third argument to customElements.define(), with the extends property specifying the tag name of the element to extend.
4. Asynchronous Upgrades
Custom elements that haven't been defined yet (i.e., their JavaScript class hasn't been loaded and registered) are called "undefined" elements. When the definition is registered later on, all existing instances of the element on the page will be automatically "upgraded" to the defined behavior.
5. Scoped Custom Element Registries
This is a proposal that would allow different parts of a document to have different sets of defined custom elements. As of my knowledge cut-off in September 2021, this was still an emerging part of the specification and might not be implemented in all browsers.
6. Integration with Other Web Technologies
Custom elements are designed to work seamlessly with other web technologies, including Shadow DOM, HTML templates, and ES modules. This integration enables the development of highly modular and reusable components.
Example
This example showcases a custom element with life cycle callbacks and attribute observation, providing a powerful mechanism for creating complex and interactive components.
Custom elements, along with other Web Component technologies, represent a significant step forward in web development, aligning well with modern practices and patterns.
class MyButton extends HTMLElement {
  constructor() {
    super();
    // Custom initialization logic
  }

  connectedCallback() {
    // Called when element is added to the DOM
  }

  disconnectedCallback() {
    // Called when element is removed from the DOM
  }

  attributeChangedCallback(name: string, oldValue: string, newValue: string) {
    // Respond to attribute changes
  }

  static get observedAttributes() {
    return ["some-attribute"]; // List of attributes to observe
  }
}

customElements.define("my-button", MyButton);
CustomElementsRegistry
The CustomElementRegistry interface provides methods for registering custom elements and querying registered elements in the browser. It's a key part of the custom elements specification, and it allows developers to define new custom HTML elements and associate them with JavaScript classes.
Here's a breakdown of the main methods and functionalities of the CustomElementRegistry:
1. define(name, constructor, options?)
This method is used to define a new custom element. The name is a string representing the name of the custom element, the constructor is a class defining the element's behavior, and the optional options object can specify an element to extend.
2. get(name)
This method returns the constructor for the named custom element, or undefined if the custom element is not defined.
3. whenDefined(name)
This method returns a promise that resolves when a custom element with the specified name is defined. It can be used to handle scenarios where you might be interacting with custom elements before they are defined.
4. upgrade(root)
This method is used to force the upgrade of custom elements within a specific shadow tree or document subtree. This might be useful in scenarios where you need to ensure that custom elements are upgraded and ready for interaction at a specific time.
Here's an example of how some of these methods might be used:
// Defining a custom element
customElements.define(
  "my-element",
  class extends HTMLElement {
    // Custom behavior here
  }
);

// Querying a defined custom element's constructor
const MyElementConstructor = customElements.get("my-element");

// Waiting for a custom element to be defined
customElements.whenDefined("my-element").then(() => {
  console.log("my-element has been defined");
});
The customElements object itself is an instance of CustomElementRegistry, and it is typically accessed through the global customElements property.
By providing a clear interface for registering and interacting with custom elements, the CustomElementRegistry enables developers to create modular, reusable, and encapsulated components, aligning with modern web development practices. It's an essential aspect of working with Web Components, and understanding its methods and behavior can be very useful for front-end development.